Por que a CNC é perfeita para placas de madeira
- Precisão e repetibilidade: Letras nítidas, espaçamento consistente e pedidos repetidos idênticos.
- Liberdade de design: Escritas entalhadas em V, letras em relevo, incrustações, detalhes em 3D e fundos texturizados. Escala sob demanda: Faça um presente personalizado ou 50 para um evento ou loja.
- Fluxo de trabalho limpo: CAD → CAM → Entalhe → Acabamento. Etapas claras reduzem erros e retrabalho.
Máquinas recomendadas para trabalho com placas:
- TTC-450 Pro — Pegada amigável para hobistas, ideal para placas de porta e sinais de decoração de 12–18".
- TTC-6050 — Área de trabalho maior para peças de destaque, placas de negócios e painéis de nível de mobiliário.
- TTC-H40 / TTC-H80 — Rigidez e capacidade para produção em pequena escala para profissionais.
Passo 1: Crie o design da sua placa de madeira
Seu design define o tom de tudo o que se segue. Clareza é fundamental: fontes legíveis, altura de letra adequada e forte contraste são inegociáveis.
Escolha o seu software
- Carveco Maker / VCarve Desktop: Projetado especificamente para confecção de placas com percursos de ferramenta V-carve, vetores e aninhamento.
- Easel: Design simples baseado na web para placas simples e pequenos lotes.
- Fusion 360: Poderoso CAD/CAM se você já modela em 3D ou deseja controle paramétrico.
Fundamentos de layout para legibilidade
- Seleção de fontes: Use fontes em negrito e legíveis para o texto principal. Combine scripts com moderação para detalhes.
- Altura da letra: Mantenha a maioria das letras ≥ 20–25 mm (≈0.8–1") para uma leitura confortável à distância de visualização típica.
- Kerning e espaçamento: Aperte ou solte para evitar ilhas frágeis ou interiores apertados (especialmente com entalhe em V).
- Hierarquia: Uma linha focal (nome / empresa) + linhas secundárias (data de estabelecimento, slogan).
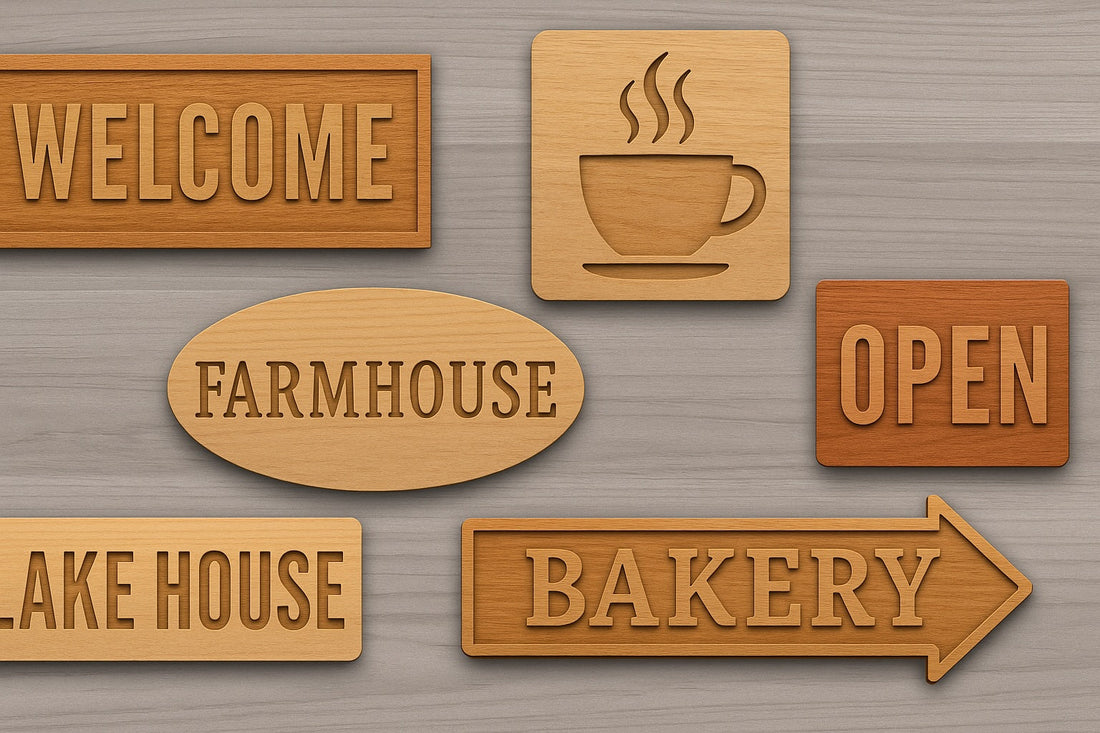
Abordagens de design
- Letras entalhadas em V: Visual clássico gravado. A ferramenta alarga com a profundidade; ideal para fontes com serifa e script.
- Letras em relevo: Rebaixe o fundo, deixando as letras salientes para pintura/acabamento de alto contraste.
- Incrustações: Corte letras de madeira ou acrílico contrastantes e cole em um rebaixo.
- Fundos texturizados: Adicione um percurso de ferramenta de textura rasa atrás das letras para aumentar o valor percebido.
Preparação de arquivo
- Use vetores (SVG/DXF) para percursos de ferramenta limpos e dimensionamento.
- Converta traços em contornos para evitar surpresas de largura ao importar.
- Junte vetores abertos e remova duplicatas para evitar cortes duplos.
Passo 2: Entalhe a placa
O sucesso na máquina vem de uma boa fixação da peça, da broca certa, de percursos de ferramenta sensatos e de testes a seco antes de cortar material caro.
Preparação e fixação da peça
- Aplanar e esquadrar: Aplane/lixe uma face; esquadre as bordas se o alinhamento da moldura for importante.
- Placa de sacrifício: Use uma placa sacrificial por baixo para proteger a mesa e permitir o corte em profundidade total.
- Fixação da peça: Braçadeiras, braçadeiras de came de baixo perfil, pregos + cola CA para fita, ou uma mesa a vácuo para produção.
- Zeragem: Ajuste X/Y a partir de um canto conhecido; Z a partir da superfície superior para controle consistente da profundidade.
Escolha a broca certa para o trabalho
- V-Bits (60° / 90°): Letras gravadas, serifas finas, bordas de placas.
- Fresas de topo planas (1/8"–1/4"): Escavação de fundos, limpeza de rebaixos para letras em relevo ou incrustações.
- Pontas esféricas (⅛" / ¼"): Arredondamento suave, texturas, detalhes em 3D.
- Espirais de corte para baixo: Bordas superiores limpas em folheados/compensados; combine com um passe final raso para nitidez.
Percursos de ferramenta principais (Kit de ferramentas para fabricação de placas)
- Entalhe em V: A profundidade varia para corresponder à largura do vetor; produz detalhes nítidos rapidamente.
- Escavação: Limpa o fundo ou rebaixos para letras em relevo/incrustações; finalize com um leve passe de acabamento.
- Corte de perfil: Corta a placa no formato final; adicione abas para evitar movimentos de última hora.
- Textura / Hachura: Um leve passe com ponta esférica adiciona profundidade visual premium atrás do texto.
Teste a seco e verificações de sanidade
- Simule os percursos da ferramenta no CAM para identificar cortes excessivos, vetores perdidos ou colisões de ferramenta.
- Execute um "corte a ar" acima do material para os primeiros trabalhos ou placas complexas.
- Comece conservadoramente nas velocidades de avanço, depois aumente à medida que as aparas parecerem saudáveis e a qualidade do corte se mantiver.
Escolha da máquina por tamanho de placa
- Placas de porta / decoração de prateleira (≤ 18"): TTC-450 Pro.
- Peças de destaque / vitrines: TTC-6050.
- Lotes de produção / madeiras de lei: TTC-H40 ou TTC-H80.
Passo 3: Dê o acabamento como um profissional
O acabamento é o que os clientes notam primeiro. Um bom lixamento e escolhas inteligentes de cores elevam qualquer design.
Preparação da superfície
- Rebarbar e lixar: Elimine as irregularidades; evite lixar excessivamente os detalhes delicados entalhados em V.
- Pano pega-pó / ar: Remova o pó antes de aplicar qualquer acabamento ou tinta na superfície.
Três fluxos de trabalho de acabamento confiáveis
-
Natural + Transparente
- Lixe até 180–220 grãos.
- Aplique óleo (dinamarquês, tungue) ou verniz wipe-on; várias camadas finas ficam mais ricas do que uma camada espessa.
- Lustre com uma almofada cinza/branca entre as camadas para um brilho sedoso.
-
Preenchimento de letras com tinta
- Primeiro, sele a madeira bruta (seladora ou selador de lixamento) para reduzir o escorrimento.
- Pincele ou injete tinta nas letras; limpe o excesso enquanto úmido com um cartão plano.
- Camada final de acabamento transparente após a cura completa para proteção.
-
Mascarar → Pintar → Descolar
- Aplique fita adesiva (ou fita de pintor) antes de entalhar.
- Entalhe através da fita; pulverize ou pincele a cor nas áreas gravadas.
- Retire a fita para revelar bordas nítidas; aplique uma camada superior para durabilidade.
Incrustação de epóxi (visual premium de alto contraste)
- Crie uma cavidade nas letras/fundo com ~2–3 mm de profundidade com uma fresa de topo plana.
- Sele as bordas da cavidade para reduzir o escorrimento do corante.
- Misture epóxi tingido; despeje um pouco acima da superfície.
- Após a cura, nivele com uma fresa de facear ou lixadeira; finalize com um verniz transparente.
Placas externas
- Escolha madeiras resistentes à podridão (cedro, teca) ou compensados para exterior.
- Primer + tinta para exterior, ou verniz marítimo para acabamentos transparentes.
- Sele as bordas e qualquer veio exposto meticulosamente.
- Use ferragens de aço inoxidável para pendurar; considere cunhas francesas para estabilidade.
Materiais e Pontas Tabela de consulta
| Material | Caso de Uso | Observações | Pontas Típicas |
|---|---|---|---|
| Pinus / Madeiras macias | Decoração econômica, placas rústicas | Propenso a rasgar; selar antes de pintar | V-bit 60°/90°, fresa de topo para baixo 1/4", plana 1/8" |
| Bordo / Nogueira / Cerejeira | Presentes premium, placas de negócios | Mantém detalhes finos; acabamento lindo | V-bit 60°, fresa de topo para baixo 1/8", esférica 1/8" |
| Compensado de Bétula / Bétula Báltica | Painéis estáveis, placas preenchidas com tinta | Movimento mínimo; bordas de pintura limpas com máscara | V-bit 90°, fresa de topo para baixo 1/4", plana 1/8" |
| MDF | Placas pintadas, fundos texturizados | Empoeirado; sempre sele as bordas antes de pintar | V-bit 90°, plana 1/4", plana 1/8" |

Ideias de projetos (Iniciante → Avançado)
Iniciante
- Placa com nome da família e borda simples (somente entalhe em V).
- Placa com número da casa e fonte sans-serif em negrito.
- Pequena decoração de prateleira com citação em dois estilos de fonte (principal + destaque).
Intermediário
- Placa com letras em relevo com fundo rebaixado e preenchimento de tinta.
- Placa comercial com vetor de logotipo e fundo texturizado hachurado.
- Placas direcionais para casamento/eventos com setas e ícones.
Avançado
- Letras embutidas em madeira (nogueira em bordo) com superfície nivelada e acabamento a óleo.
- Placa de mídia mista: base de madeira, detalhe de rio de epóxi, placa de identificação de metal gravada.
- Detalhe em relevo 3D combinado com tipografia entalhada em V.
Dicas para vender placas de madeira CNC
Estrutura de preços
- Materiais: placa + acabamento + consumíveis (máscara, epóxi, lixa).
- Tempo de máquina: minutos de corte × taxa da oficina (inclua tempo de configuração). Mão de obra: design, lixamento, acabamento, embalagem.
- Custos fixos e margem: desgaste de lâminas/bits, utilitários, taxas de plataforma.
Embalagem e apresentação
- Inclua cartão de cuidados e ferragens para pendurar (serra, furo, ou cunha francesa).
- Use protetores de canto e embrulhe para evitar arranhões no acabamento durante o transporte.
Aumentos de personalização
- Nomes, datas, coordenadas, esquemas de cores personalizados.
- Opção de atualização para madeira premium ou incrustação de epóxi.
- Atualização de acabamento para uso externo (verniz marítimo).
Quer aumentar a produção? As máquinas TTC-6050 e TTC-H40/H80 oferecem a área de trabalho e a rigidez para processar grandes pedidos com qualidade consistente.
Solução de problemas comuns
Bordas borradas / arrancamento
Use uma fresa de topo para baixo para limpeza da borda superior, passe de subida versus convencional conforme necessário, e garanta ferramentas afiadas. Sele madeiras macias levemente antes de entalhar escritas detalhadas.
Tinta escorrendo nos veios
Primeiro, sele as áreas gravadas (goma-laca/selador de lixamento), use mascaramento e evite diluir excessivamente as tintas. Lixe levemente e aplique verniz após a cura completa.
Letras muito finas / frágeis
Aumente a espessura do traço ou mude de letras em relevo para letras entalhadas em V. Adicione filetes nos cantos internos para reduzir o risco de lascar.
Profundidade inconsistente
Nivele sua placa de sacrifício, verifique a planicidade do material, alinhe o fuso e verifique novamente o Z-zero após as trocas de ferramenta.
Marcas de ferramentas visíveis
Adicione um passe de acabamento leve, reduza o stepover, aumente ligeiramente o RPM ou mude para um acabamento mais afiado. Lixe com um bloco plano para manter as superfícies niveladas.
Perguntas frequentes
Qual o tamanho da broca que devo usar para letras de placas típicas?
V-bits (60° ou 90°) cobrem a maioria das letras. Use 60° para detalhes mais finos e 90° para caracteres mais largos e ousados.
Quais espécies de madeira são melhores para detalhes nítidos?
Maple e nogueira mantêm bem as bordas e têm um acabamento bonito. A bétula báltica é uma opção de painel estável e econômica para placas preenchidas com tinta.
Preciso de um coletor de pó?
Altamente recomendado. Ele mantém as bordas mais limpas, reduz o retrabalho e protege sua oficina e seus pulmões. Combine com um aspirador de pó ou coletor de pó.
Como penduro uma placa pesada com segurança?
Use um suporte francês ou ferragens de furo tipo chave de dois pontos ancoradas em montantes. Para instalações externas, use fixadores de aço inoxidável e selantes à prova de intempéries.
Pronto para começar a entalhar? Escolha a CNC que se adapta ao seu espaço e objetivos:
- TTC-450 Pro — fabricante de placas compacto e econômico.
- TTC-6050 — capacidade extra para peças de destaque e produção em lote.
- TTC-H40 / TTC-H80 — desempenho de nível profissional para fluxos de trabalho de produção.